Overview
Moodle’s Attendance activity allows instructors to record attendance during class, either by recording it themselves or allowing students to report their own attendance. It also allows students to view their own attendance record within the activity or in the optional Attendance block located in the block drawer which provides quick access to a summary report.
Attendance is recorded using customizable status descriptors, such as “present,” “late,” “absent,” or “excused.” If set to be a graded activity, the attendance record integrates seamlessly with Moodle’s gradebook and scales appropriately. You can also easily generate attendance reports for the entire class or for individual students.
The Attendance activity is a great option if you are looking for a more efficient way to record attendance directly within Moodle.
Watch the following video for a quick overview, or refer to our written instructions below for more details.
Step 1: Add the Attendance Activity
When adding the Attendance activity in your course, place it somewhere that is easily accessible by students (e.g. near your course outline) since this is where students will visit when they are monitoring and/or recording their attendance.
To add an Attendance activity to your course, you will add it just like any other activity:
- Turn on edit mode
- Click “Add an activity or resource”
- Select Attendance
Bonus: Add the Attendance and Calendar Blocks
The Attendance activity also synchronizes with the Attendance and Calendar blocks. To add a block to your course:
- Turn on edit mode
- Open the Block Drawer toggle
- Select “Add a block.”
- Select the Attendance and/or Calendar blocks
The Attendance block provides teachers and students with quick access to the Attendance activity and a summary report.
The Calendar block displays a variety of events. Attendance sessions can be added as a calendar event at the time of creation.
Step 2: Check the Attendance Activity Settings
After adding the Attendance activity you will immediately be brought to the activity’s settings. Add a name and description to the activity if you wish.
There are two primary settings to be aware of: determining the grade for the activity and whether it is a group activity (i.e. whether you want to target attendance sessions towards different groups).
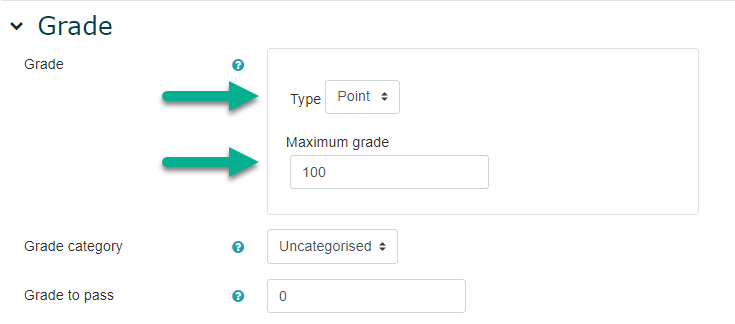
In the Attendance activity settings, select the “Grade” toggle. Here you can set the grade type (usually “none” if an ungraded activity or “point” for a graded activity) and the maximum grade. Note that Moodle will scale students’ attendance scores appropriately in the gradebook according to the maximum grade set for the activity.
Making the Attendance activity a group activity can be particularly useful if you are using a Moodle shell that combines different course sections. This would allow you to target attendance sessions to a particular section. See Step 4 below for instructions on how to create attendance sessions.
Remember! Groups need to be created separately within the Participants list in Moodle. For information about creating groups see “Groups/Groupings.”
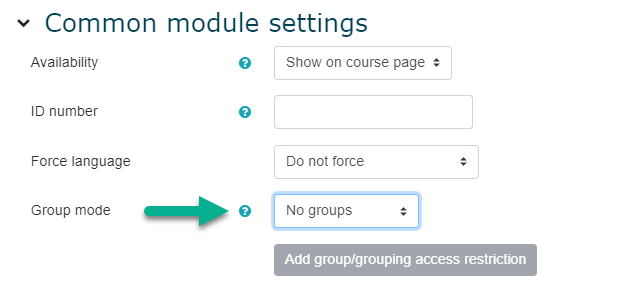
To set the group mode for the Attendance activity, select the “Common module settings” toggle within the activity settings. By default, group mode will be set to no groups. You can change this to separate groups, which restricts you to only adding attendance sessions targeted towards groups of students, or visible groups, which allows you to target attendance sessions towards groups of students or all students.
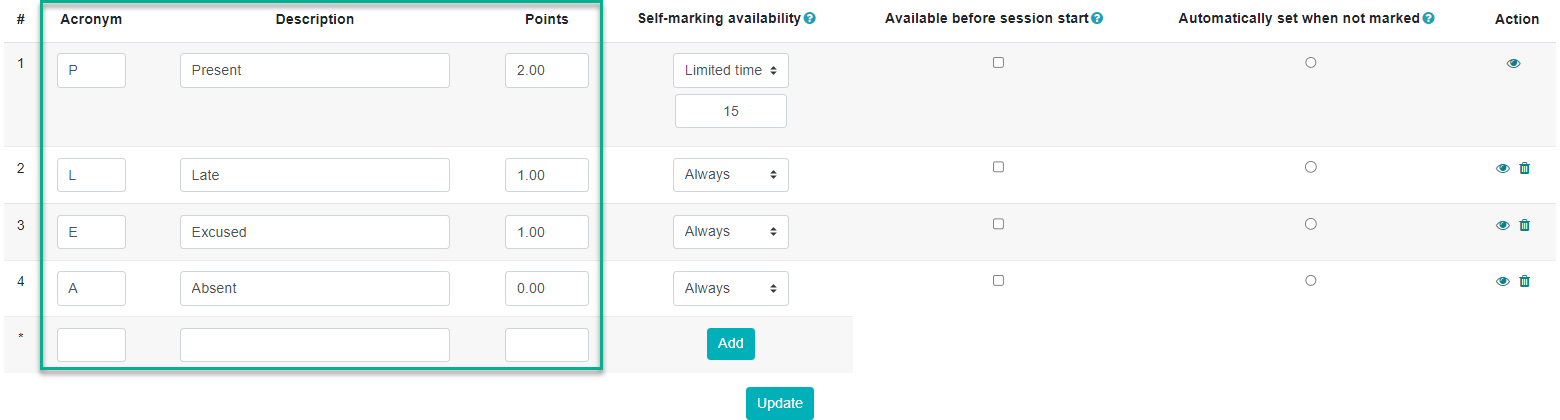
Step 3: Review & Update Your Status Set
After you have configured your activity settings, we recommend reviewing your status set and updating it if necessary. The status descriptions and associated point values determine the available options for recording attendance and how the grade is calculated.
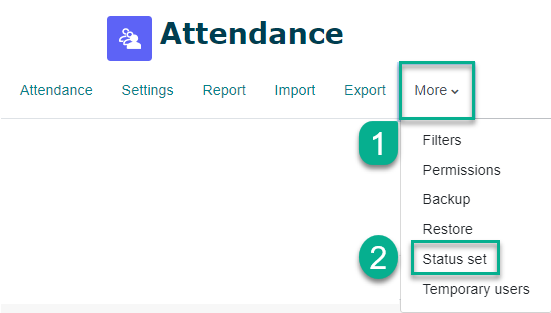
To access the status set, select the More tab within the Attendance activity and then “Status set.”
By default, the follow status options are set:
- Present (2 points)
- Late (1 point)
- Excused (1 point)
- Absent (0 points)
These values determine how the grade is calculated. For example, let’s say you set the maximum grade to 100 in the Attendance grade settings and you keep the status set as: Present= 2 points, Late= 1 point, Excused= 1 point, and Absent= 0 points.
- In Session 1, if the student marked themself as Present, they would receive 2/2 for attendance and an overall grade of 100/100
- In Session 2, if the student marked themself as Late, they would receive 1/2 for attendance. Their overall grade would change to 75/100 (since they now have a total of 3/4 points for Attendance)
You can add an additional status or edit the acronym, description, and points of an existing status.
There are also several behavioural customization options:
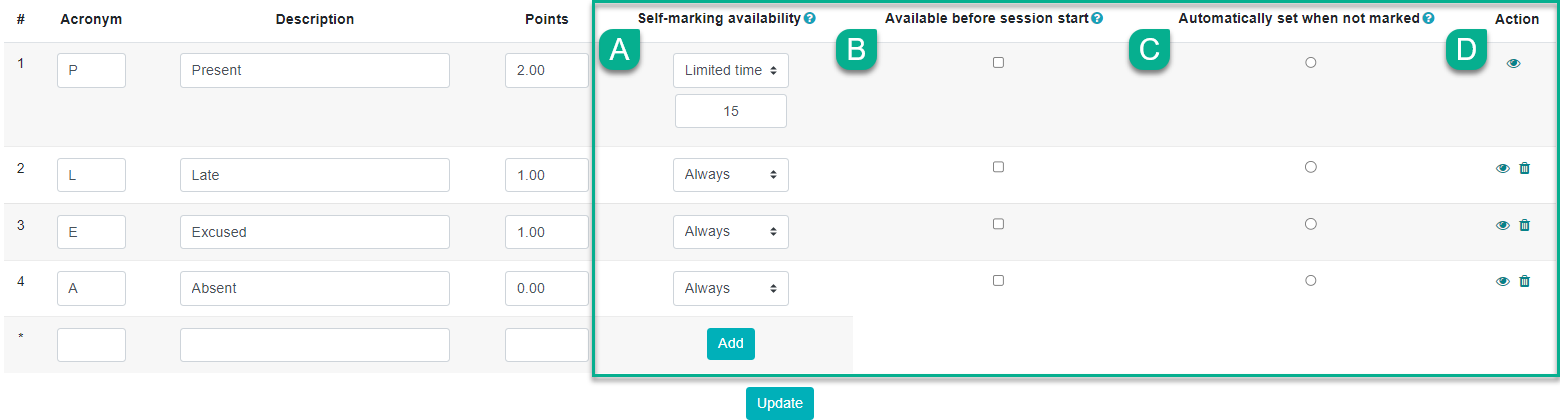
A. Self-Marking Availability
Restrict the availability of this status to “always,” “limited time,” or “no.” Selecting “limited” allows you to enter a time limit (in minutes) that students can report this status from the beginning of the session. For example, you could limit the availability of recording “Present” within the first 15 minutes of class as seen in the figure above. This setting is only relevant if students are self-recording their attendance (see Step 4 below).
B. Available Before Session Start
Check to allow this status to be chosen before the session begins. This setting is only relevant if students are self-recording their attendance (see Step 4 below).
C. Automatically set when not marked
Check to set this status to be recorded if the student does not mark their own attendance. This setting is only relevant if students are self-recording their attendance and automatic marking has been set to “Set unmarked at end of session” in the attendance session (see Step 4 below). Note: If you are enabling student recording and this is not turned on, students who do not record their attendance during a session will not be marked as absent. Moodle will ignore that particular session when calculating the student’s mark and manual intervention would be required to mark them absent.
D. Action
Hide or delete a status.
Step 4: Create Your Attendance Sessions
Now that you have configured your activity settings and your status set(s), it is time to start adding sessions.
To do so, first click on the Attendance tab within the Attendance activity. This is where your sessions will be displayed. Click “Add session” to add a new session.

You will be brought to the new session settings that includes the following three sections:
- Add Session
- Multiple Sessions
- Student Recording
Each of these sections are discussed in further detail below.
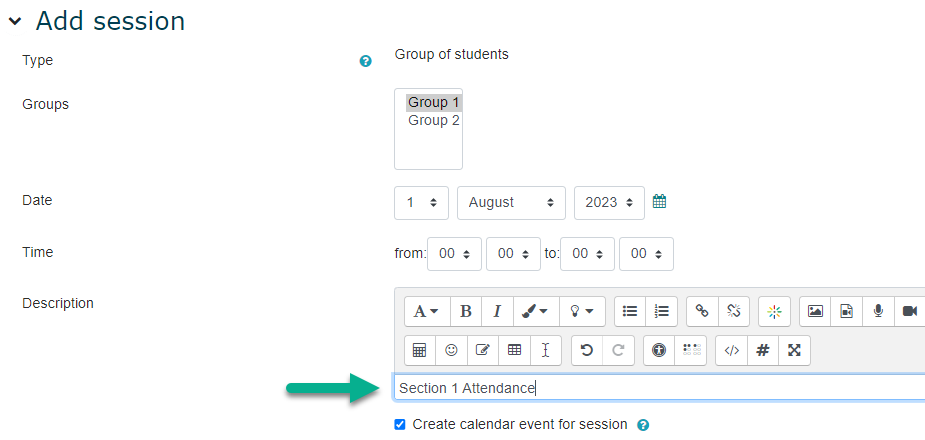
Under the “Add session” heading, you will see the following options:
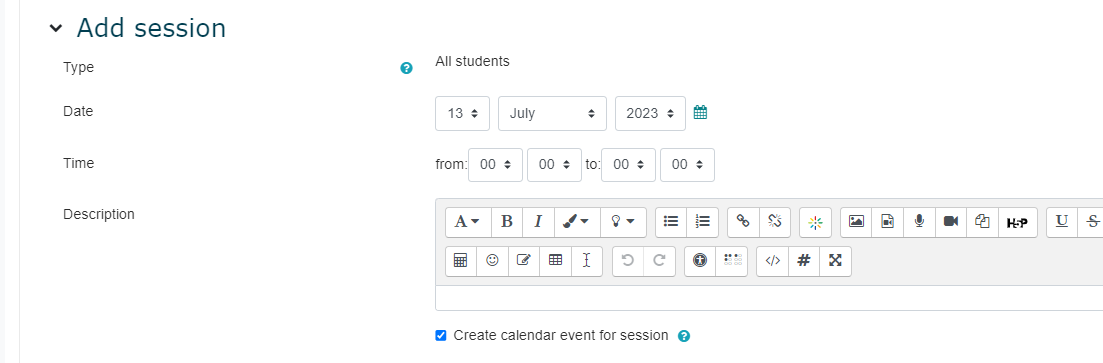
Set the following:
- Type – select whether this session is available to all students or only a particular group of students (if enabled in the activity settings).
- Date of the session.
- Time of the session (when the session will be “open” to record attendance).
- Description – here you can add a description for the session. For example, “Lecture Session” or “Seminar Session.” If left blank, the description will be displayed as “Regular Class Session” by default.
- Check whether you would like to create a Calendar event for the session. This would be displayed in the Calendar block in the block drawer, if it has been added, as well as the Calendar block available in students’ dashboards.
If you are only creating one session and will not be enabling student self-recording, you can finish creating your session by selecting the “Add” button located at the bottom.
After you have created your first session, as described above, you can then choose to repeat the session under the “Multiple Sessions” heading:

Set the following:
- Which days the session is to be repeated on.
- The frequency that it will be repeated. For example, if the session is to occur weekly, set “repeat every” to 1 week.
- The end date that the session will stop occurring.
If you are not enabling student self-recording, you can finish creating your repeating sessions by selecting the “Add” button located at the bottom.
After you have created your single or repeating session, as described above, you can allow students to record their own attendance by checking the box under the “Student Recording” heading.
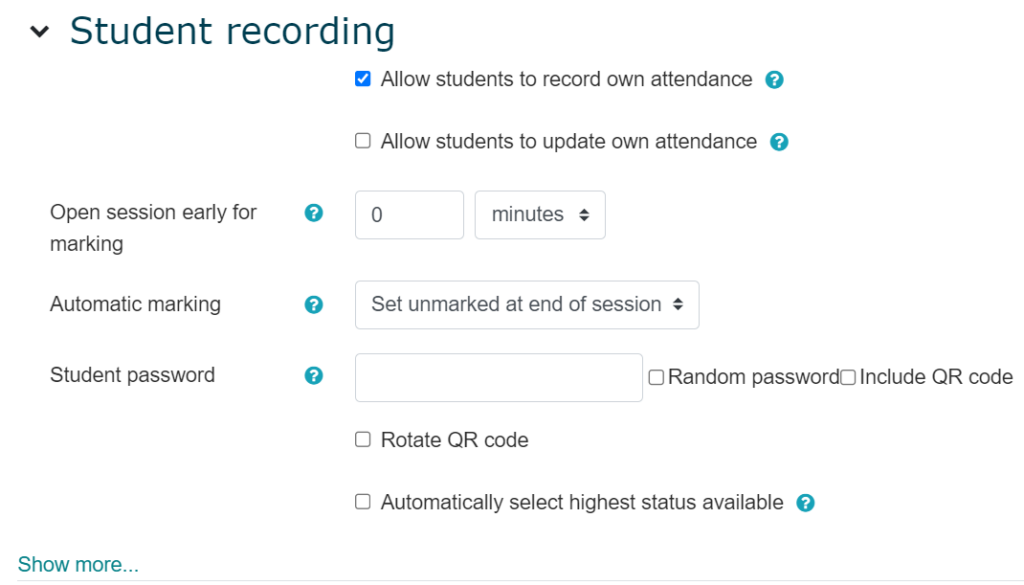
After this box has been checked, you are provided with a number of customization options:
- Allow students to update own attendance
If checked, it allows students to update their attendance during a session after they have already self-reported it. This prevents the teacher from needing to intervene if a student mistakenly records the wrong status. - Open session early for marking
This allows teachers to open the session early by the specified number of minutes, allowing attendance to be taken before the official start time. This can be useful if you want to enable students arriving early to record their attendance before class starts. - Automatic Marking
This option will only appear if “Automatically set when not marked” has been selected for at least one status set (see Step 3 above). If set to “yes,” students will be automatically marked depending on their first access to the course. If “set unmarked at end of session” is selected, any students who have not recorded their attendance will be set to the unmarked status selected. - Student password
If this is set, students will be required to enter a password before they can record their attendance for the session. If left blank, students will not be required to enter a password.
The following password options are available:– Manually create a password
– Generate a randomized password
– Include a QR code for students to scan with a mobile device
– Include a QR code that rotates every 15 seconds
Some of these options behave differently and can be used in combination in the following ways:
- If a custom password is created it will be repeated each session. Random passwords are randomized for each session.
- Randomized passwords and the QR code can be used in combination to provide both options to students.
- The rotating QR code currently will not display a password (custom or randomized), so this may be an accessibility issue for those students unable to scan the QR code. The random password can still be retrieved by the teacher by editing the session and provided to students another way.
- Automatically select highest status available
If this is selected, students will automatically be assigned the highest available grade.
Attendance sessions can be targeted to particular groups or course sections if you are working in a Moodle shell that has multiple sections linked. Only the group that is selected will be able to view and access the attendance session that has been created for them. Groups need to first be configured in the Participants list. Refer to Groups/Groupings for instructions on how to do so.
Targeting an attendance session to a particular group requires two primary steps: (1) turning on group mode in the Attendance activity settings, and (2) selecting the appropriate group when creating your attendance session(s).
To set the Attendance activity to group mode:
- In the Attendance activity settings, open the “Common Module Settings” heading.
- Set “Group Mode” to either visible groups or separate groups. Selecting visible groups will give you the option to make your attendance sessions available to all students or to a particular group.
- Save your changes.
To select the group that will be given access to the attendance session:
- Click “Add Session” from the Attendance tab.
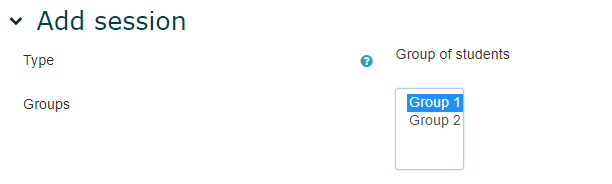
- Under the “Add Session” heading, set the Type to “Group of students.” This option will only be available if group mode has been turned on in the activity settings.
- Select the group to be targeted.
- Finish adding your session as described above.
Multiple different repeating sessions can be added within the same Attendance activity. When adding an attendance session, use the description box to provide context for the session. For example, “Lecture Attendance, ” “Seminar Attendance,” or “Section #.” Remember, you can target a session towards a particular group/course section, as described above.
Each session would display the date, group (if set), and description all within the same Attendance activity, as well as a singular grade item within the gradebook.

As noted above, there are several password options that can be set when enabling students to record their own attendance. Teachers can choose when to display the password to students, ensuring that they must be present to record their attendance. Randomized passwords or using the rotating QR code option can help prevent students from sharing the password for that session.
To recap, the following password options are available:
- Manually create a password.
- Generate a randomized password.
- Include a QR code for students to scan with a mobile device.
- Include a QR code that rotates every 15 seconds.
Some of these options behave differently and can be used in combination in the following ways:
- If a custom password is created it will be repeated each session. Random passwords are randomized for each session.
- Randomized passwords and the QR code can be used in combination to provide both options to students.
- The rotating QR code currently will not display a password (custom or randomized), so this may be an accessibility issue for those students unable to scan the QR code. The random password can still be retrieved by the teacher by editing the session and provided to students another way.
Once you have finished adding your attendance sessions, they will be listed in the Attendance tab inside the activity. Click the gear icon next to a session to edit it or the trash icon to delete it.

Step 5: Determine Your Attendance Recording Workflow in the Classroom
Now that you have finished adding your attendance sessions, you may be wondering how to go about recording attendance. You can choose to record attendance yourself, or enable students to record their own attendance. Remember, teachers can record attendance at any time, but students can only report their own attendance during the session time, taking into account whether the session is set to open early for recording and whether any time limitations have been put on particular status options.
Your created sessions will appear in the Attendance tab within the activity. If you have enabled student recording for a session and have set a password and/or QR code, select the password icon for the relevant session to display it to your students.

The following resource illustrates two simple processes of how students can self-record their attendance when both the randomized password and QR code options are selected. Please note, if different attendance options are set, the student view and self-recording process may differ from the resource below. Feel free to download and share these instructions with your students!
Taking Attendance
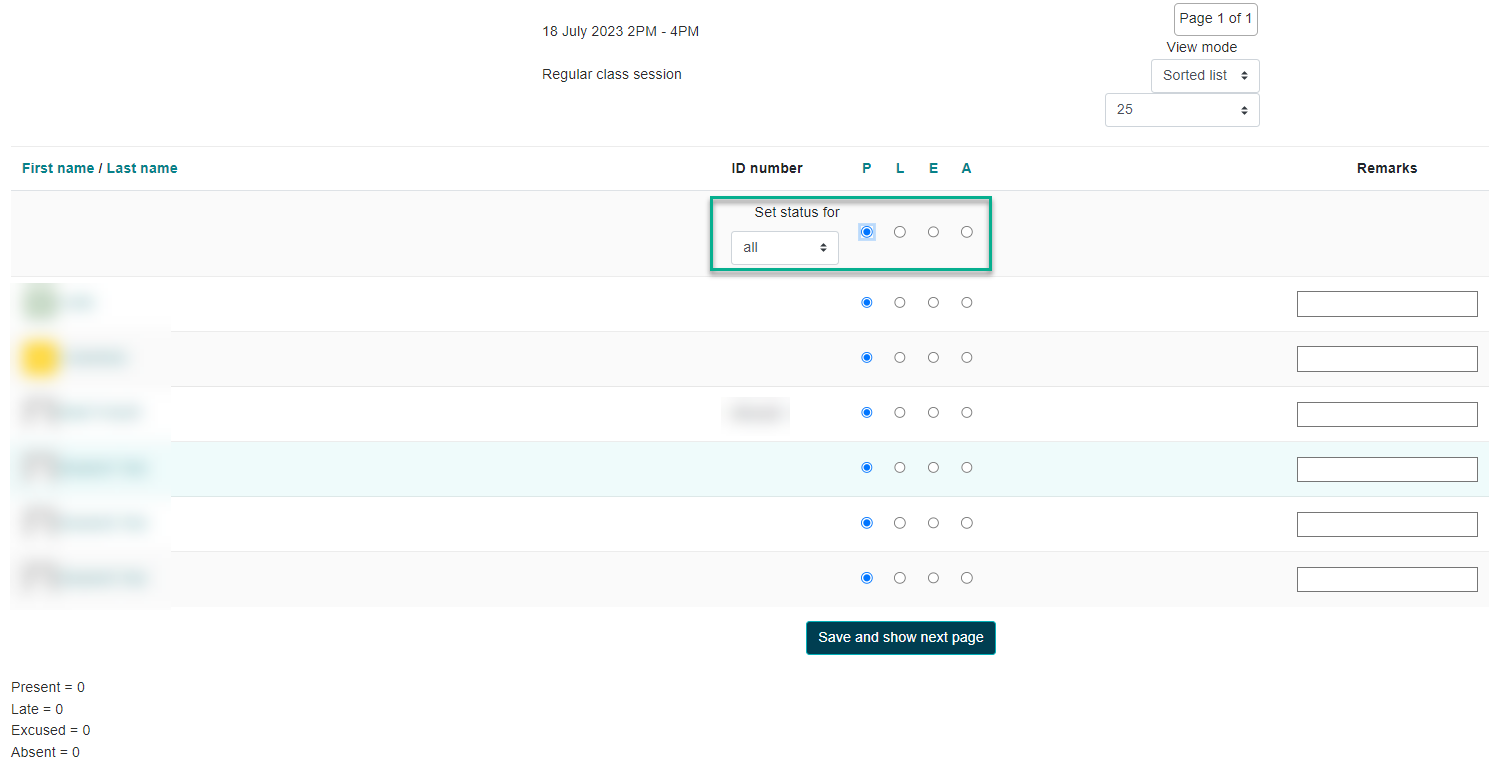
Your created sessions will be listed on the Attendance tab within the activity. To take attendance, select the “Take attendance” icon next to the relevant section.

You can then select a status for each student and add any relevant remarks to provide context for the status assigned. For example, you may want to make note of the reason an absent was excused or how late the student was. Selecting the toggle for a status in the top row allows you to assign that status to students in bulk.
Updating Attendance
To update the attendance record for a session in which attendance has already been recorded, simply select the “change attendance” icon. Teachers can update an attendance record at any time, including after a session has ended.

To view the attendance history for your class:
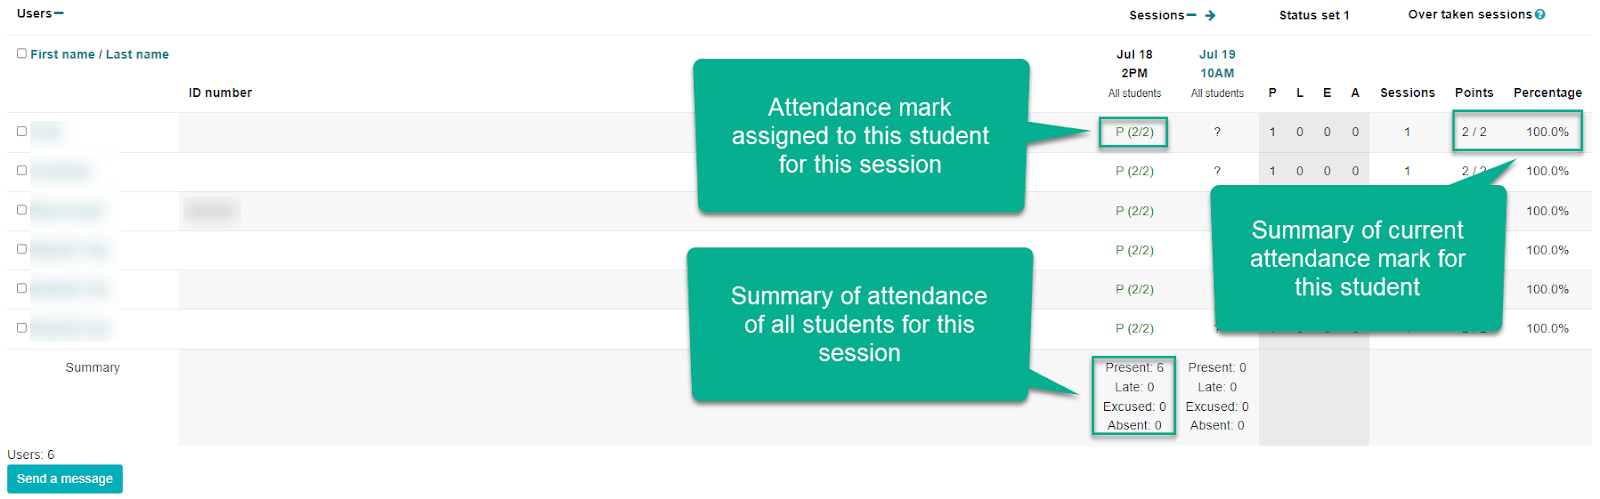
To view a summary report for the entire class, select the Report tab within the activity. Here you will find the attendance record for each student, including a breakdown of each attendance session and a summary of their current attendance mark.
A summary of the attendance for each session is also provided.
Finally, you have the ability to send a message to a singular student or multiple students at a time by selecting their name and then “send a message.” For example, you may want to check in with students who are frequently absent from class.
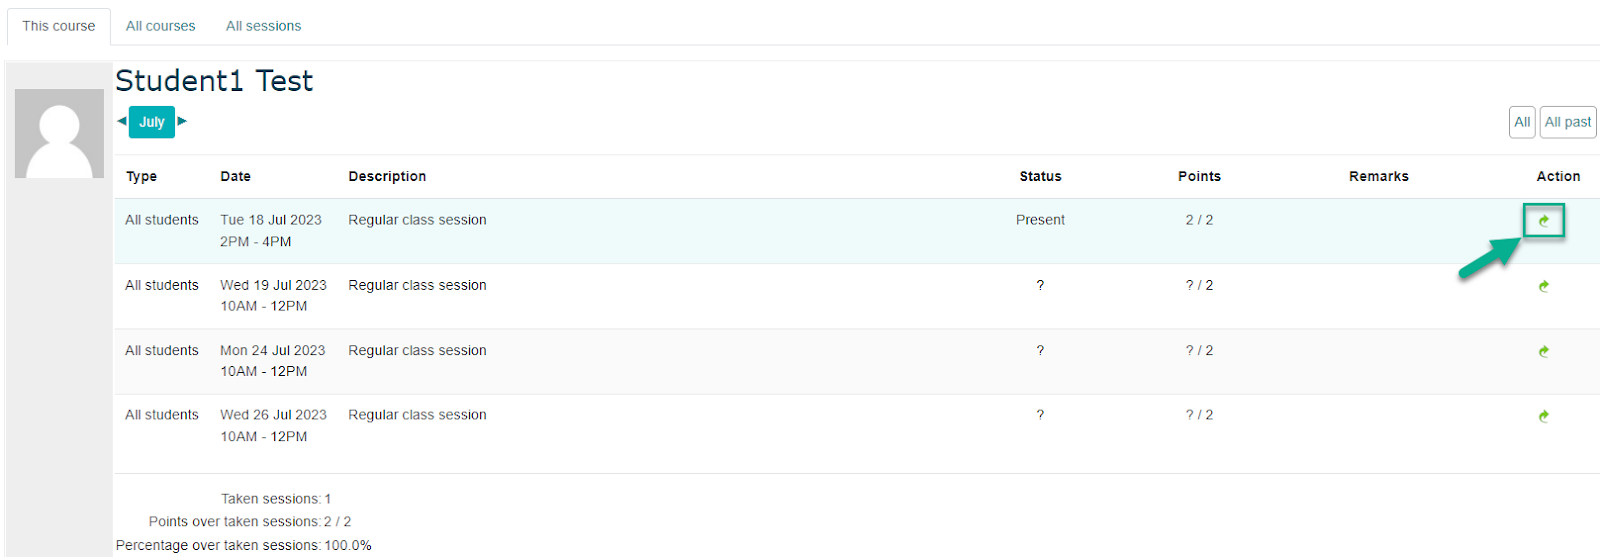
To view the attendance history for a particular student:
From the Report tab, simply click on a student to view a more detailed version of their attendance history. From here, you can select the “change attendance” icon to update their attendance mark for a particular session.
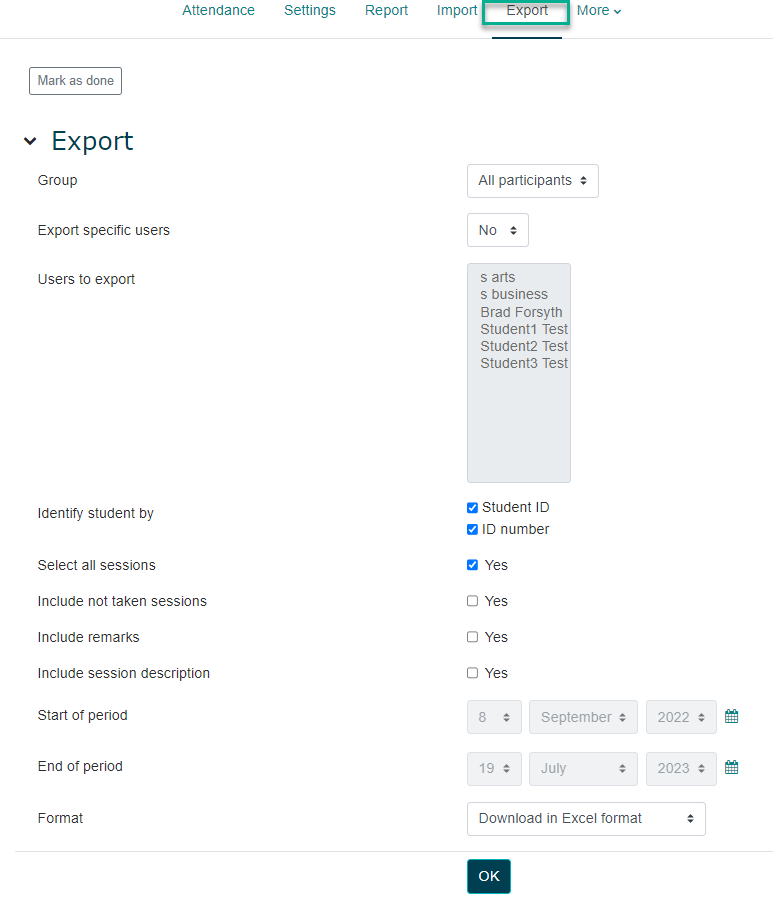
Select the Export tab within the Attendance activity and configure the following options:
- Group: Select All Participants or a particular group.
- Export Specific Users: If “yes” is selected, you can choose only specific students to include in your report.
- Users to Export: Select which students to include in the report.
- Identify student by: check Student ID and/or ID number. Note: check “ID number” to include students’ TRU-ID in the report.
- Select all sessions: If unchecked, you can specify a date range of attendance sessions to be included.
- Include not taken sessions: If checked, will include sessions that attendance has not been taken for.
- Include remarks/include session description: Choose to include remarks that you recorded and the session description. If no session description was included it will be displayed as “regular class session.”
- Start of period/end of period: Enter the date range of the sessions to be included if “select all sessions” was not checked.
- Format: choose from Excel, OpenOffice, or Text format.