Like with most features, there are several different ways to mark in Moodle, but in essence there are 3 ways to grade and add feedback:
- One student at a time
- Multiple students at once
- Offline grading
- Go into your Moodle course, find the assignment you want to grade and click on this assignment’s name.
- Select grade.
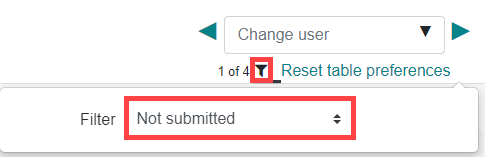
- At the top of the page, in the right hand corner, under where it says change user, select the blue filter button icon. When the drop-down appears select which group you would like to mark by, or check that this is set to what you would like to view already.
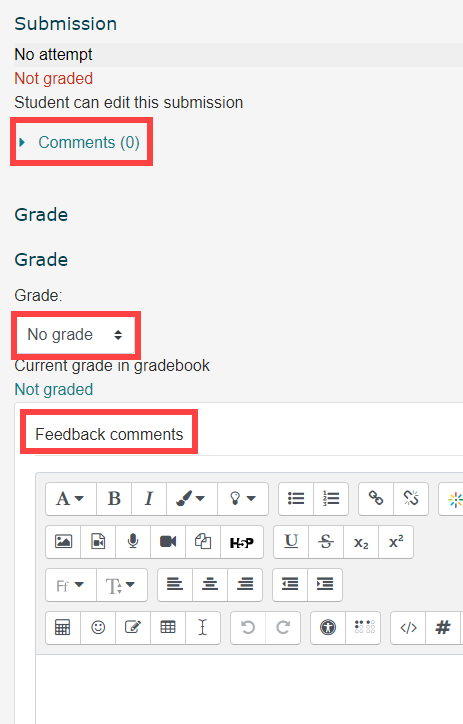
- Click on the students assignment attachment to view it, enter the grade and any comments or feedback on the assignment submission page.
- At the bottom, in the middle of the page: check off notify student if you would like students to receive a Moodle notification of their now graded assignment.

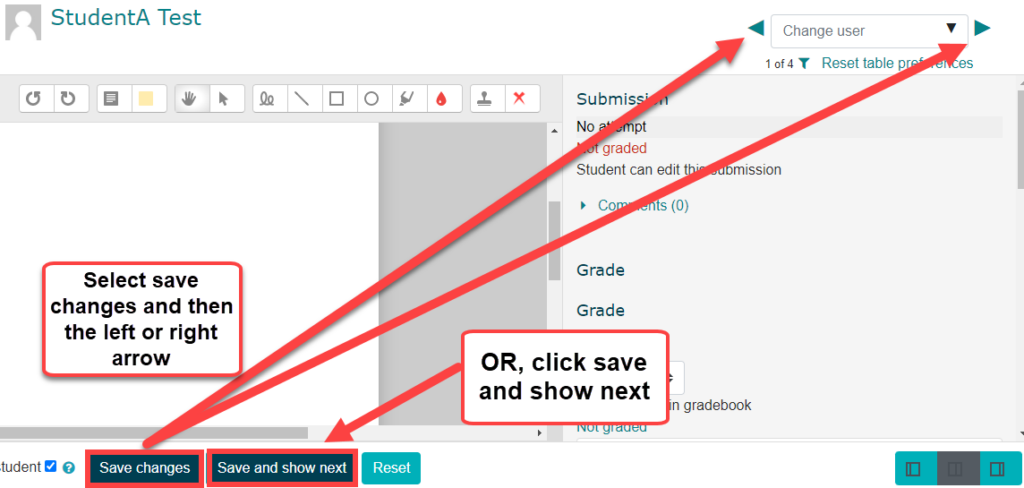
- Then select Save changes, followed by the blue left or right arrow in the top right corner of the page to move to the previous or next student to mark OR click Save and show next to bring you to the next student to mark.
Note
In the bottom right corner there are 3 pane views, play around with this to see how you’d like to view each submission. The icons from left to right allow you to see just the grading pane, the assignment and the grading pane (default) and just the assignment.
- Go into your Moodle course, find the assignment you want to grade and click on this assignment’s name in blue.
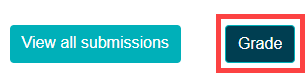
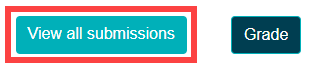
- Select view all submissions in teal.
- Scroll to the bottom of the page and where it says quick grading, and select the box to the left of this to enable it, if it is not enabled already.
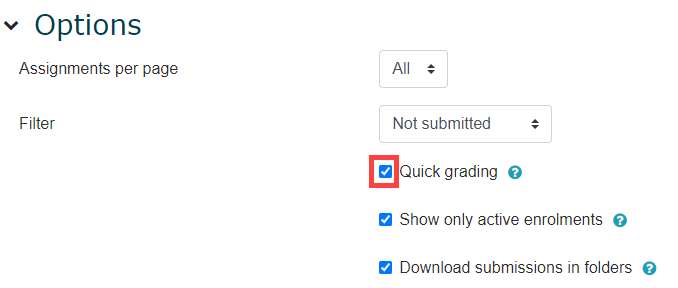
- Scroll back up to the top of the page. Now you can view each student assignment here and under the grade column for each student, select the dropdown to choose the grade you would like for each of them or type in a score. You can also add feedback here in the feedback comments column.

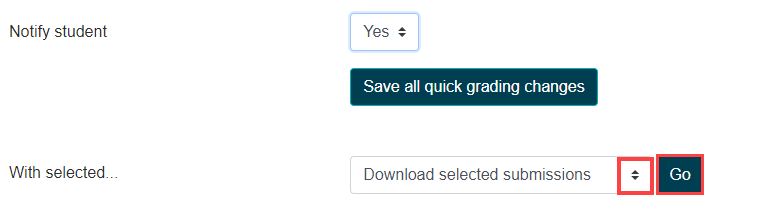
- Near the bottom of the page, select if you would like to notify students or not in the drop-down menu.

- Under this select save all quick grading changes in blue to save.
Note
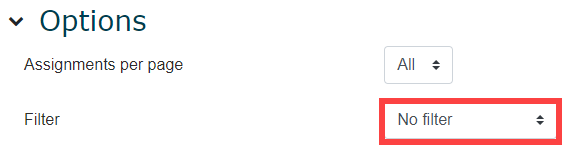
Be careful though, if you are having issues with this page, and cannot view all of your students even though you have selected all next to student’s last and first names at the top of the page, scroll to the bottom of the page and to the right of the filter, ensure the drop-down is set to no filter.

Frequently Asked Questions
Offline feedback is when you are able to add feedback to a students submission (i.e. essay) without being logged into Moodle, or having access to the internet.
To complete the process and provide your offline feedback back to your students, there are 3 main steps that need to occur (see below, under 3 steps for offline feedback, for the detailed instructions).
There are three steps to offline feedback.
To be able to add feedback to you students assignments without the internet, you first have to download all of these assignments onto you computer.
- First, go into your Moodle course, find the assignment you want to grade and click on this assignment’s name.
- Select View all submissions.
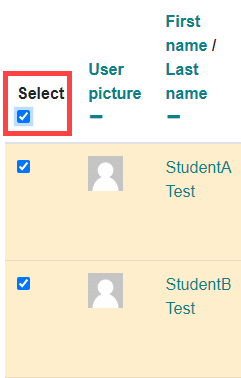
- Select all individuals/students, by checking off the box next to select. Then scroll down near the bottom of the page and choose download selected submissions from the drop-down and hit go.
- Drag or save the .zip file to your desktop.

- Unzip the .zip file. For Windows users, right click the file and click extract all.. and save it to your desktop. It should now be one regular file with all the students’ individual submissions inside.
DO NOT rename any of the submission documents. This will become very important if you choose to read and follow our advanced marking documentation.
- Click on this file you just unzipped
- Then click on a students file, and then click on their submission document within this file.
- Do this for each student you wish to mark, and add your feedback to their files and save. We suggest adding feedback through the track changes tool for Word, or by adding comments to PDF’S.
- Go into your Moodle course, find the assignment you want to grade and click on this assignment’s name in blue.
- Select grade in blue.
- At the top of the page, in the right hand corner, under where it says change user, select the blue filter button icon. When the drop-down appears select which group you would like to mark by, or check that this is set to what you would like to view already.
- Give each student a grade.
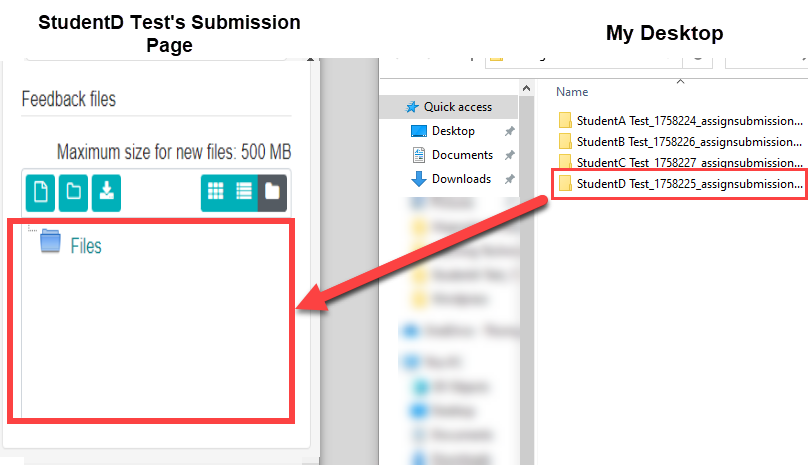
- On your screen(s) be able to see both the folder with all your marked essays, but also the first submission page of the student who’s essay you have marked.
- Drag the marked essay of that student to their submission. You will drag it to the feedback files section.
- At the bottom, in the middle of the page: check off notify student if you would like students to receive a Moodle notification of their now graded assignment.

- Select save changes in blue and then the blue left or right arrow in the top right corner of the page to move to the previous or next student to mark, OR click save and show next in blue to save changes to automatically bring you to the next student.
Note
There is an easier way to add your offline feedback where, you upload multiple feedback files at once by using a .zip file. The method we have described above is more time strenuous but easier for beginners. However, if you would like to learn this other method, please go to the “Offline Grading” topic on this website to view the instructions on uploading multiple feedback files using a .zip file!
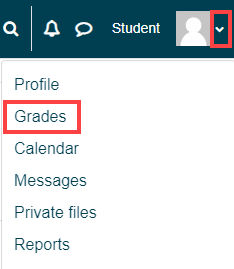
One way students can view their grades is, by signing into Moodle, going to the top right corner where their name is, clicking the drop-down and selecting grades. Once on this page, they can also click on the course name for more details on this grade.
Another is, once in their course, in the right hand navigation drawer (under Activities) they can select assignments or quizzes.
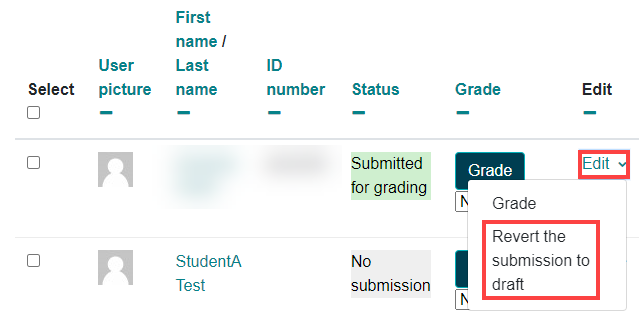
If a student has submitted their assignment, the submission dropbox will lock and they will no longer be able to upload anything.
If you would like to re-open this submission for the student so they can re-submit something, you can either :
- 1) mark their first submission as incomplete (if you have it enabled on the assignment setting for students to have multiple attempts) or,
- 2) revert their submission to draft.
To revert a submission to draft, click on the assignment title in blue and select view all submissions. Then, find this student’s name and click on the blue edit next to their grade and select revert the submission to draft.
You may want to annotated a student’s assignment if, you would like to give a student feedback on their assignment directly within Moodle. Instead of, having to download their submission and adding comments within the file itself, and then re-uploading it to their submission as a feedback file!
Note
You can only annotate PDF assignments in Moodle!
To annotate an assignment, click on the assignments title in blue and then select Grade. Then, where it says Change user, click the drop-down and select the participant you would like to mark. You should now see this PDF on the left hand side of the page. Above this is a row of tools you can click on to annotate your assignment and if you hover over each icon, it will tell you what it does!

There are several tools to mark up assignments here and to find out what they are or what you would like to use, we encourage you to play around with these features.
Some examples of annotation tools:
To delete, select the arrow icon, then click on the item you wish to delete and select the trash can icon within the item to get rid of it.
To draw on the assignment with your cursor, click the squiggly line icon.
To stamp an assignment (i.e. checkmarks or happy faces) click on the red X icon and then pick from the dropdown which stamp image you would like to use on the assignment.
To type comments click on the icon that looks like a lined piece of paper, click and drag where you would like it and then start typing within it.
To circle something, click on the circle icon and drag it over what you would like to circle.
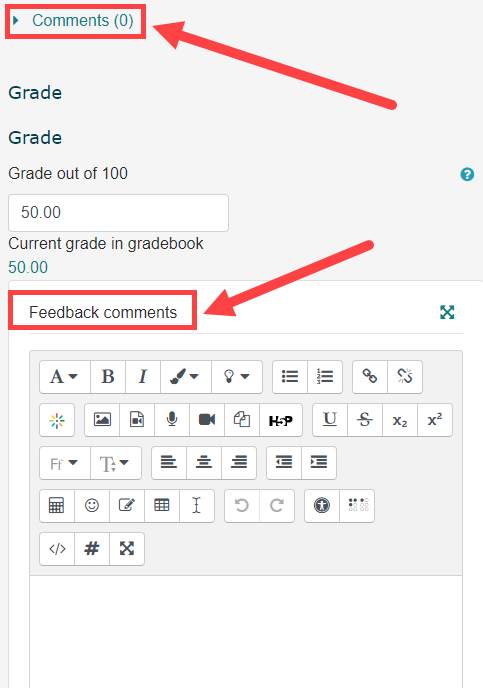
Notes can be added to a students assignment submission in Moodle as either a comment or feedback comment.
The difference is that students can only reply back to comments that are left on their assignment submission, not feedback. To add a comment, click on Comments in blue, start typing your message and then click save. To leave a Feedback comment type in the box below feedback comment.
A marking guide is an advanced grading method where a teacher enters a comment for each criterion and a mark up to a specified maximum.
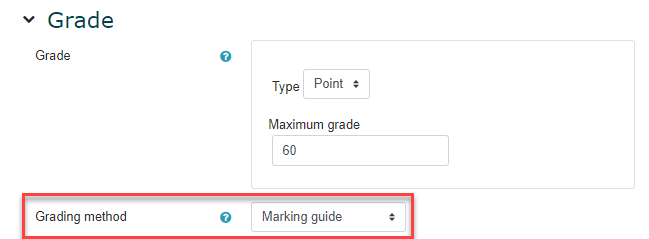
Before creating your marking guide, you must first update the grading method in your Assignment activity settings.
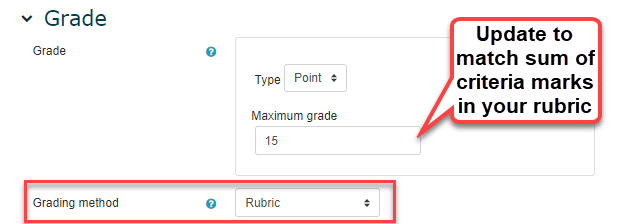
- Expand the Grade heading.
- Select Marking Guide from the Grading Method dropdown menu.
- We recommend updating the maximum grade to match the sum of all the criteria marks that will be in your marking guide.
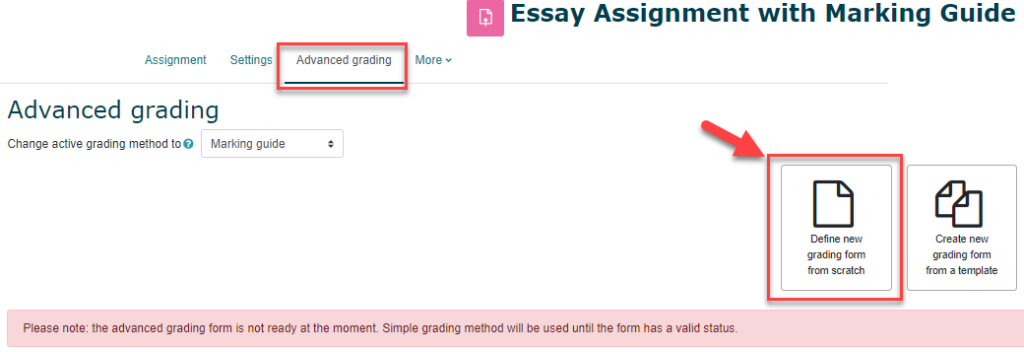
After saving your settings, you will be brought to the Advanced Grading tab in your Assignment Activity. Note that the advanced grading form is not yet ready, and simple grading method will be used until the form has a valid status. You can return to this tab at any time.
- Select “Define new grading form from scratch” to start defining your marking guide.
- Give your marking guide a name and description if you wish.
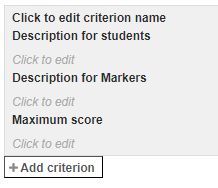
- Build your marking guide by clicking to edit criterion name, add descriptions for students and markers, and a maximum score. Add additional criteria as needed.
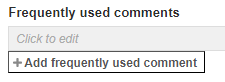
- If you regularly use the same comments when entering feedback, you can save them to the frequently used comments bank.
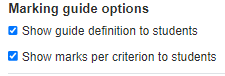
- Set the marking guide options to determine whether the guide definition and marks per criterion are displayed to students.
- Be sure to save your changes when you are done.
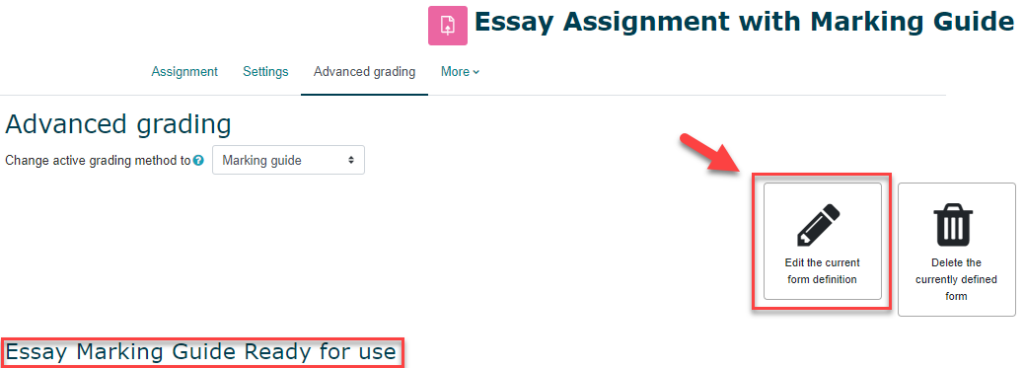
- You will note that your marking guide is now ready for use. Return to the Advanced Grading tab to edit your marking guide if needed.
- Select Grade at the bottom of the assignment activity.
- Your marking guide will display as a table on the right-hand side of the screen. You can make it larger by collapsing the review panel or by selecting the expand icon.
- By default, both the student criterion descriptions and marker criterion descriptions are displayed. These can be toggled on/off at the bottom of the marking guide.
- For each criterion, enter feedback comments in the textbox provided. If frequently used comments have been saved, click on the textbox and then the relevant comment to insert it.
- Enter the maximum score for each criterion.
Note
Part marks may be awarded.

- Below the marking guide, you may add summary feedback comments or feedback files.
- Save your changes once done.
Note
If changes are made to the marking guide after marks have been entered, student marks will need to be saved again or they will not display to students.
Rubrics are an advanced grading method used for criteria-based assessment. The rubric consists of a set of criteria plotted against levels of achievement. A numeric grade is assigned to each level. For each criterion, the assessor chooses the level they judge the work to have reached. The raw rubric score is calculated as a sum of all criteria grades. The final grade is calculated by comparing the actual score with the worst/best possible score that could be received.
Before creating your rubric, you must first update the grading method in your Assignment activity settings.
- Expand the Grade heading.
- Select Rubric from the Grading Method dropdown menu.
- We recommend updating the maximum grade to match the sum of all the criteria marks that will be in your rubric.
- Save your changes.
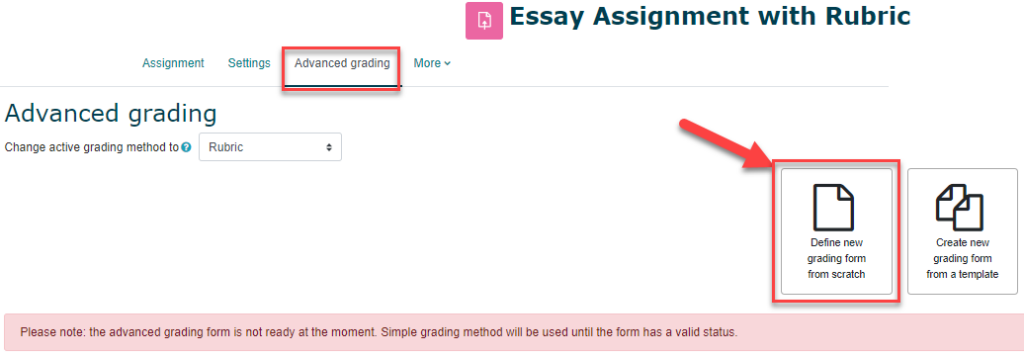
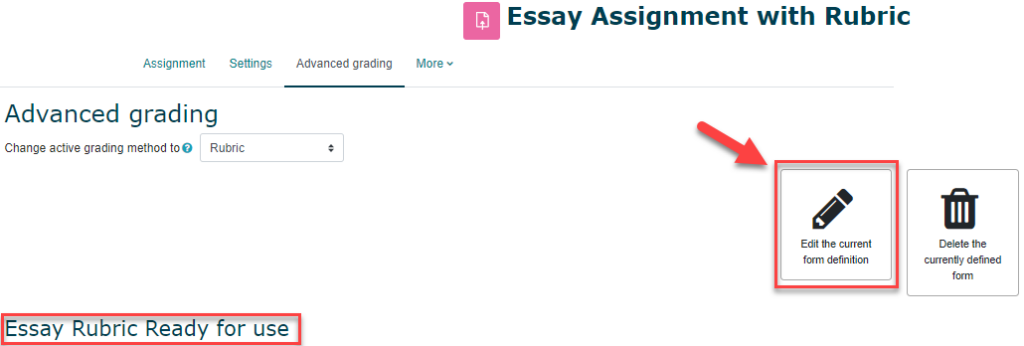
After saving your settings, you will be brought to the Advanced Grading tab in your Assignment Activity. Note that the advanced grading form is not yet ready, and simple grading method will be used until the form has a valid status. You can return to this tab at any time.
- Select “Define new grading form from scratch” to start defining your rubric.
- Give your rubric a name and a description if you wish.
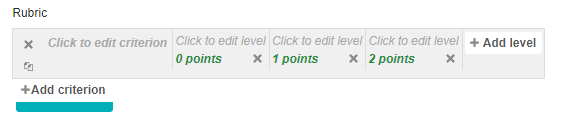
- Build your rubric by clicking edit criterion and add descriptions and assign points to each level by clicking edit level. Add additional criteria and levels as needed.
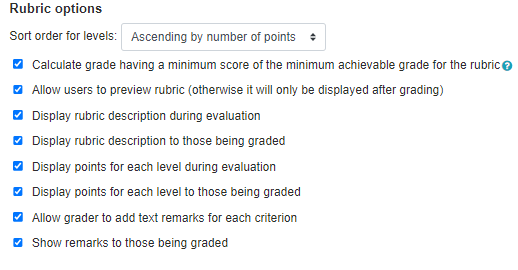
- Set the Rubric Options to control how and when the rubric is displayed to students.
Note
Enabling Allow user to preview rubric is recommended so students can see in advance how they will be assessed.
- When you are done, select Save rubric and make it ready.
- You will note that your rubric is now ready for use. Return to the Advanced Grading tab to edit your rubric if needed.
- Select Grade at the bottom of the assignment activity.
- Your rubric will display as a table on the right-hand side of the screen. You can make it larger by collapsing the review panel or by selecting the expand icon.
- For each criterion, select a level (and the associated points) by clicking on it. Selected levels will be highlighted green. A level must be selected for each criterion. Moodle will total the final mark appropriately. You can add comments for each criterion as well, if enabled in your rubric options.
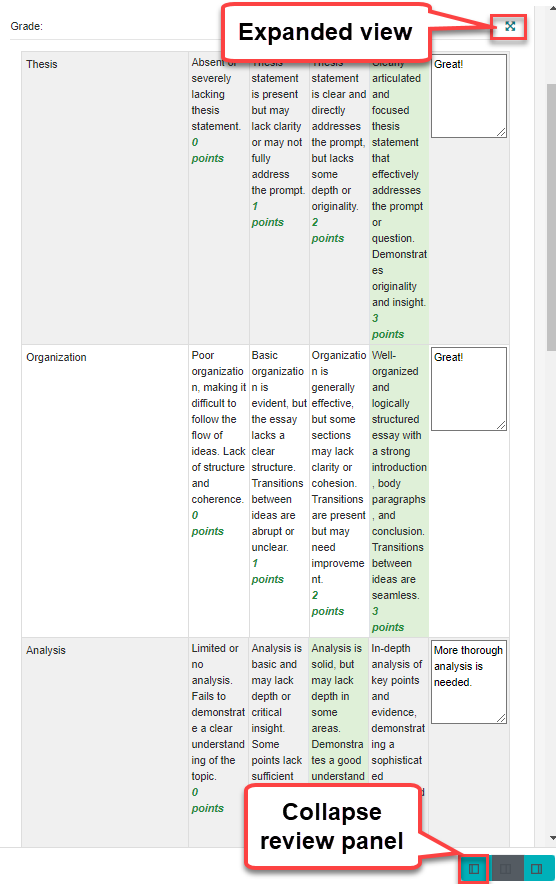
- Below the rubric, you may add summary feedback comments or feedback files.
- Save your changes once done.
Note
If changes are made to the rubric after marks have been entered, student marks will need to be saved again or they will not display to students.
Following the Moodle upgrade to version 4.5, the link provided in student assignment submission email notifications now links to the assignment activity page rather than directly to the student’s submission. These instructions will help you locate the student’s assignment submission after you have clicked on the email link:
- On the assignment page, click the “Submissions” tab at the top.
- Select “Requires grading” from the “Status All” drop down list.
- Click the vertical ellipses in the Grade column and click the“Grade” button next to the submission needing to be graded, or the Grade button in the top-right corner (note that only submissions that require grading should be listed if your filter is set appropriately).
- Another option is to search for the student’s name or filter by their first and/or last initial.

There are a number of additional ways you can navigate to assignment pages directly within Moodle without accessing the submission notification email. Once you have navigated to the appropriate assignment page, you can follow the instructions above to search for or filter student submissions. We’ll include a few options below so you can decide what works best for your workflow.
Option 1: Assessments Overview Page
Navigate to the “Assessments Overview” or “Assignments Overview” tab in your course.
Click on the relevant assignment link to access the assignment page.

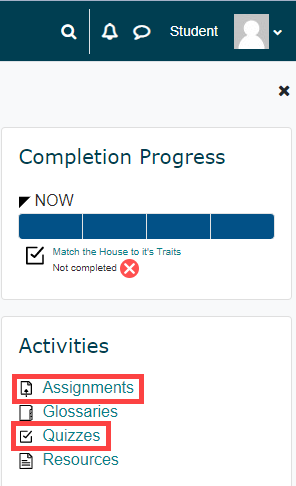
Option 2: Activities Block
You can also access a list of the course assignments from the Activities Block located in the collapsible block drawer

Click on the assignment title to navigate to the assignment page, or click on “Needs grading: #” to navigate directly to the assignment submissions.

Option 3: Progress Bar
To access an assignment page from the Progress Bar, also located in the block drawer, click on the appropriate square. The assignment title will be indicated below.

Clicking on “Overview of Students” in the Progress Bar will show the submission status of all students across all assessments. Submissions requiring grading will be highlighted in yellow. Click on the box to access the student’s submission.

Option 4: Gradebook
Finally, you can also access an assignment page from the Grader Report Screen in the gradebook. To do so, simply click on the assignment title in the column header.
